HOME
Replacing the forefoot
- Read time: 7 mins
[ariadne 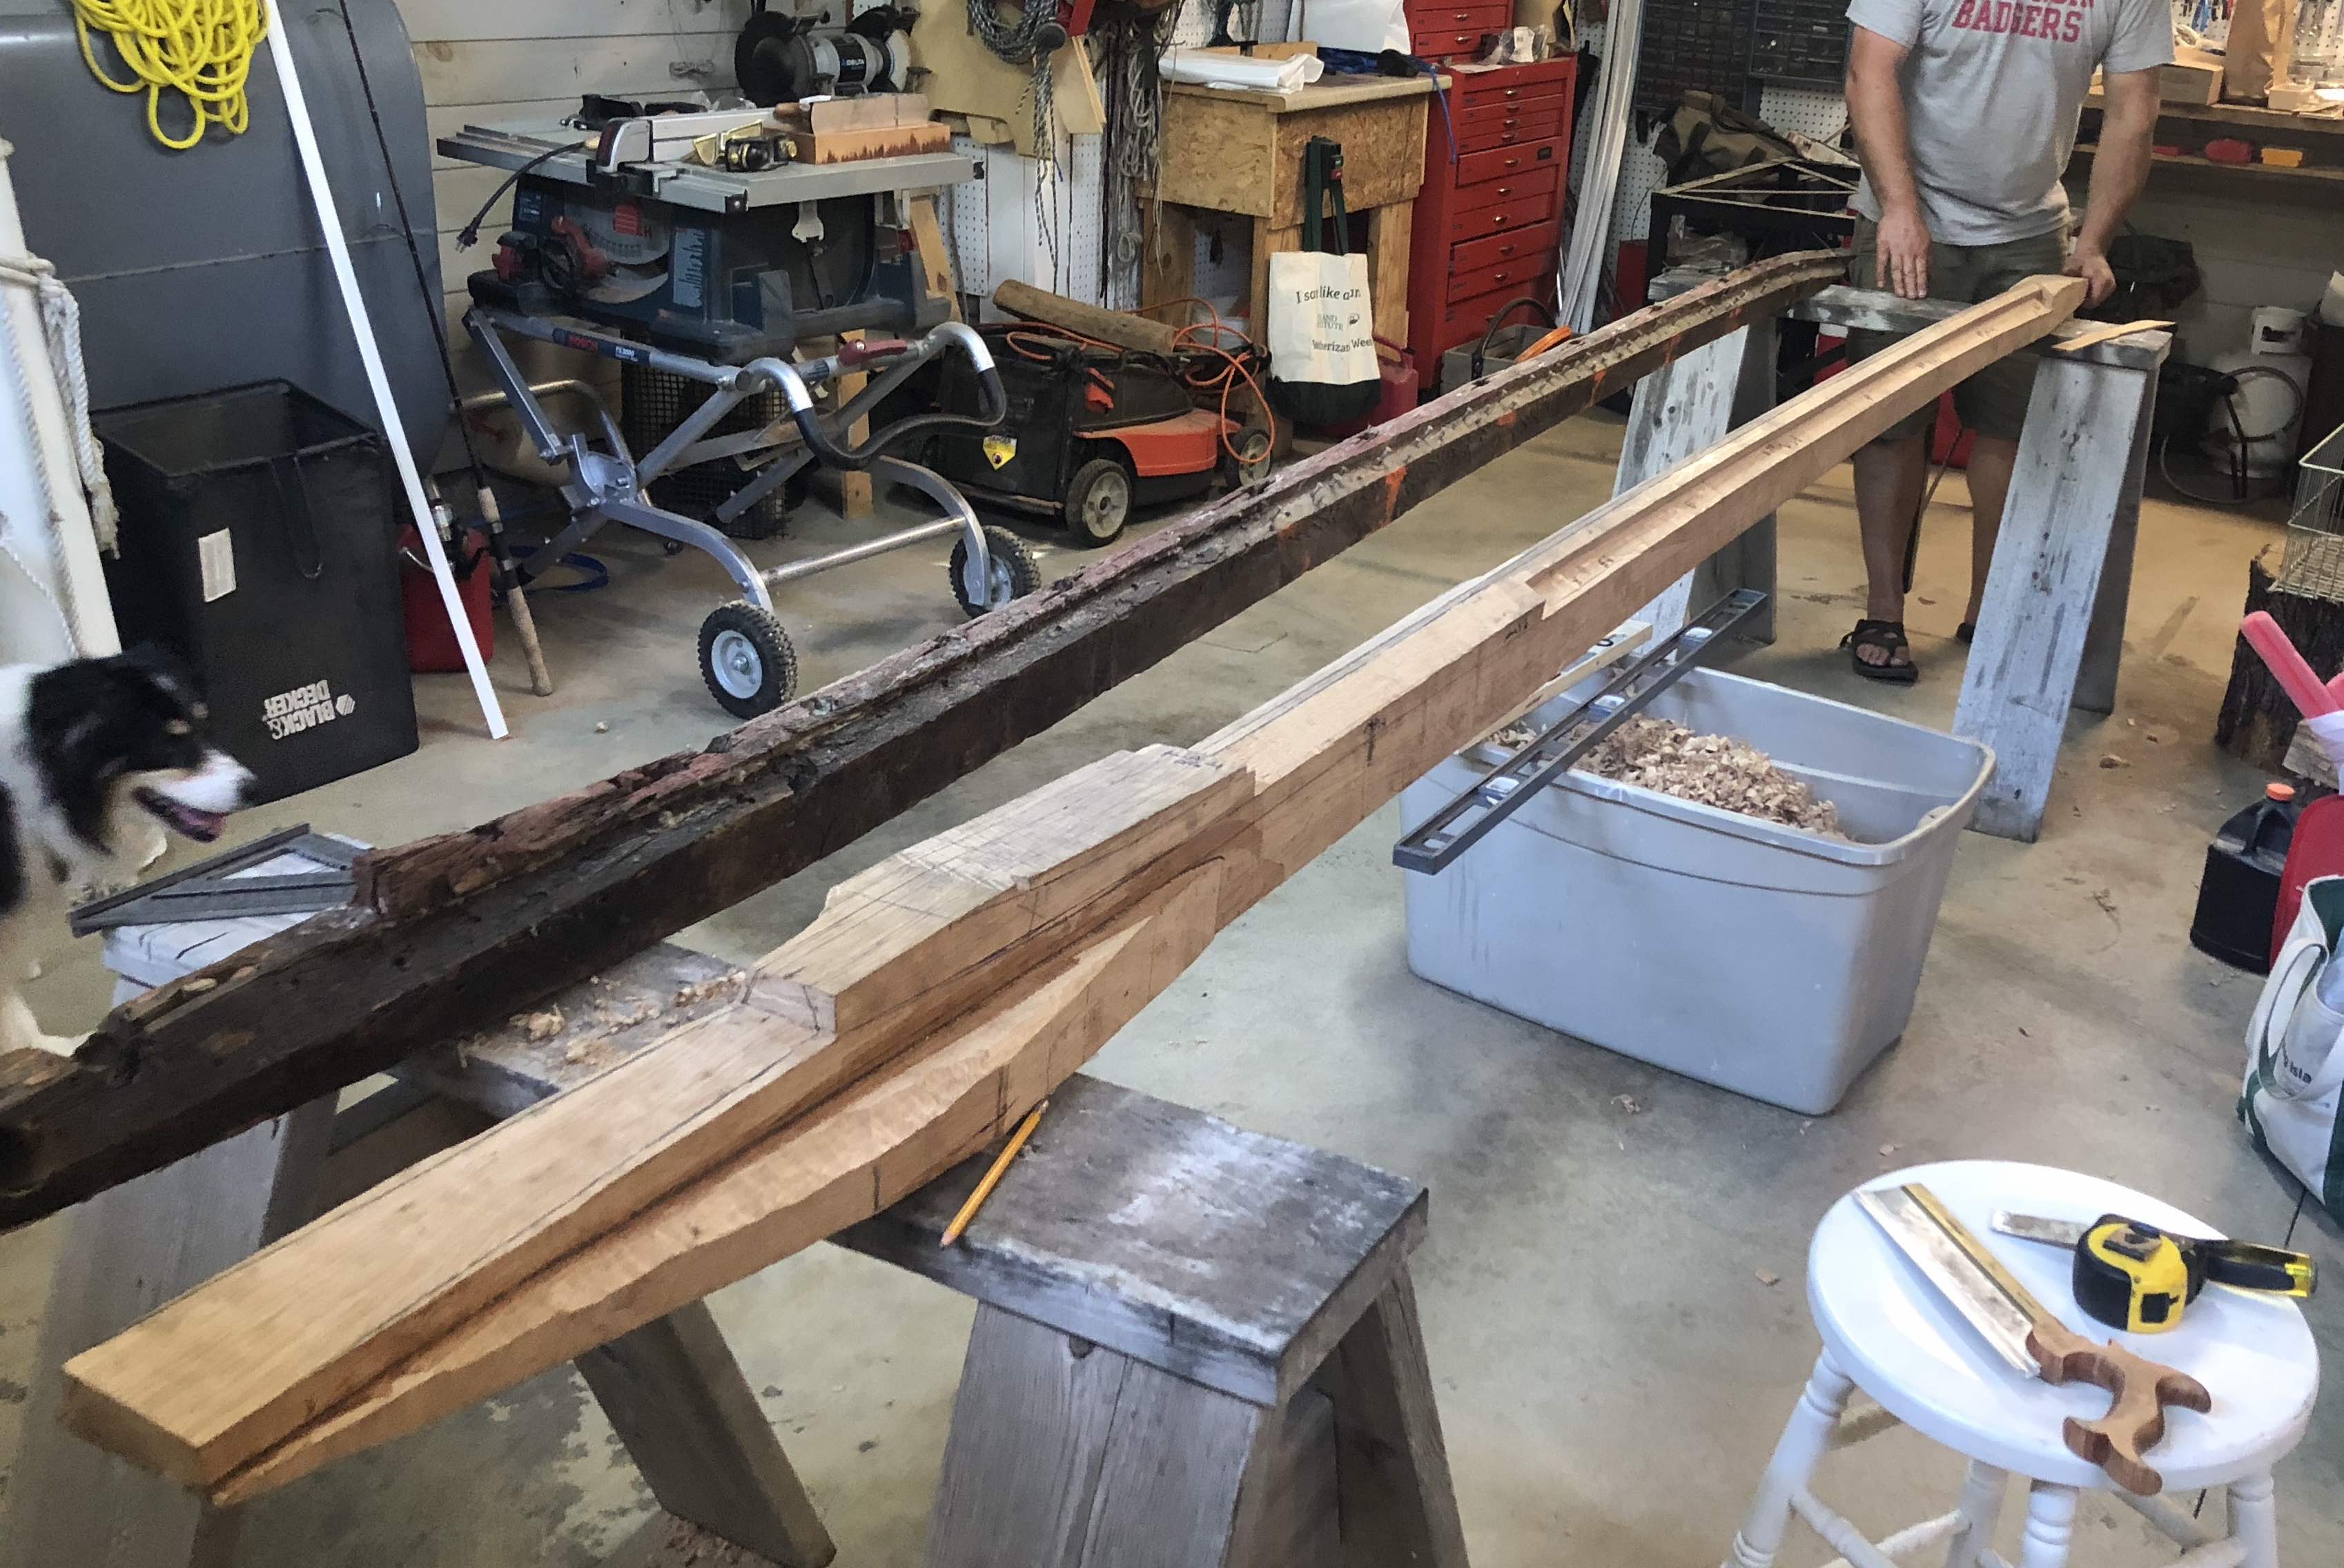
The forefoot is an essential piece of Ariadne’s structural timber - a 14’ long section of her backbone. The forefoot was totally shot - full of splits and dry rot; it could be pierced all the way through with a knife at multiple points along its length.
This was a large project with multiple stages, but was completed much more quickly than expected due to the herculean efforts of my buddy Scott, the most talented woodworker of the three of us by far.
TEMPLATING AND MOCKUP
We knew we had to replace the forefoot as it was irreparably damaged, so our first step was to construct a template that we could use to strategize and mock up our replacement piece. This was done by springing plank ends, bolting together pieces of thin pattern ply, cutting grooves to fit around the floor timbers and frames, and placing it up next to the original forefoot. Once in position, we could trace the exact shape of the existing forefoot to create a rough-cut piece.

We decided to build the new forefoot out of laminated 2” lengths of white oak. Solid lumber would have been better for this purpose, but we had access to G-Flex and 2” oak stock and decided that urgency trumped perfection in this case. We need to get Ariadne back in the water. We don’t expect the G-Flex to fail, but if it does, we can always replace this piece again if need be. So we went ahead with our plan and laminated the pieces together to accommodate our template. Can never have enough cheap clamps!

The blank was then cleaned up, joints inspected, and readied for shaping.

The shape was cut by placing the template on top of the blank, drilling small holes through the template into the piece underneath, and then marking the finished line with a flexible batten. Cuts were made on Scott’s fancy new Laguna bandsaw.

At the end of this process, Scott had built a nice squared blank to match the template we had made. He brought the new piece to the boat to begin the process of shaping and installation.
REMOVING THE OLD FOREFOOT
Before you get the new thing in, you have to get the old one out! This was a somewhat involved process, but no more so than any other task on a wooden boat. The bolts holding the old floor timbers to the forefoot needed to be removed - and were completely corroded away, as they were made of iron. Bronze wood screws fastening plank ends to forefoot rabbet needed to be backed out. Many broke or were spinners and had to be cut away.

Once the old forefoot was removed, we were treated to a nice view of the new floor timbers we had installed (see this post for more info on that process). You can see that we cut off many hood ends of the planks in this area; the planks needed to be sprung back to release the old forefoot, but many of them were damaged and were cut away for later replacement. Hood ends of planks (as well as butt joints) are commonly damaged due to the freeze/thaw process of moisture that seeps into the end grain.

SHAPING THE PIECE AND CUTTING THE RABBET
Comparing the old forefoot to the new blank was pretty striking. However, the new piece still needed to be shaped, and the rabbet to be cut. The rabbet is a groove cut into the backbone of the boat that the edges of the lowest planks set perfectly into - this joint is essential for the seaworthiness of the boat. If you have a bad rabbet, your boat’s going to leak!

Here’s a closer look, comparing the quality of the old forefoot to the new white oak. Note that the square holes are for the bungs covering the floor timber bolts, originally made out of iron.

Now, when it comes to cutting the rabbet, we had a decision to consider. Most boats built in North America cut a 90 degree rabbet symmetrically, such that the distance from the inner rabbet to the bearding line matches the distance from the inner rabbet to the outer (lower) rabbet. However, in scandinavia where Ariadne was built, the entire rabbet is inset towards the cutwater in the center of the keel timber (forefoot in this case).

The reason that the scandinavians would have found this desirable is that it increases the bearing surface of the plank on the rabbet - the plank will rest on the upper surface of the rabbet, from the inner rabbet line to the bearding line. We chose to continue this approach. The rabbet was cut with a Lie Nielsen side rabbet plane, working down gradually to the correct dimensions, and test-fitting with a piece of plank to ensure the proper fit.

The rabbet was cut in sections, with a lot of test-fitting and comparison to the old forefoot. The roughly 10’ straight section in the middle of the forefoot was the simplest to cut, while the aft and forwardmost lengths needed to be faired in when test-fit on the boat itself.

TEST FITTING
Test-fitting was essential for fairing in the rabbet correctly, but also to ensure the forefoot itself came to the necessary final dimensions. The photo below shows the testing of the rabbet, before the after end of the forefoot has begun to take shape.

The final shape of the aft section of the rabbet.

Up forward, we see the process of Scott shaping the cutwater to match the original profile and fit correctly with the stem. The cutwater here is being shaped before the forwardmost section of rabbet has been built.

At the aftmost end of the forefoot, we have the endearingly named “cobra head” - a flared section of timber that is shaped to fill what was previously an interior void that trapped water with no possibility of egress. We’re not sure why this was built that way originally, as all the floor timbers have limber holes to allow for the flow of water back to the bilge. However, without our new cobra head, there was an impassable dam that would not allow water aft of the forefoot-keel timber joint. The cobra head fills this space entirely. This feature was initally shaped with a chisel to roughly approximate the correct dimensions, then faired in by eye with a block plane, sandpaper, and Scott’s good judgment.

The final appearance of the “cobra head.” Looking nice and fair. A filler block will eventually be added on the underside of the forefoot, to fill in a small void in the leading edge of the deadwood.

PRIMING AND INSTALL
After a half dozen test fits and tons of planing and sanding, it was time for installation. First, we decided to prime the piece with a few coats of anti-microbial paint. Note, however, that we ended up not priming the rabbet or the cutwater. The cutwater will be externally visible and will thus be varnished above the waterline; below the waterline it will be primed and coated with bottom paint. We’re not sure if we should paint the rabbet so will ask around before doing so. Jay’s enjoying the process of the first coat:

After priming and the final test-fit, it was installation time. We used dolfinite as a bedding compound, which is non-structural but will prevent the transmission of moisture through joints. The forefoot was bolted forward to the stem and aft to keel timber using temporary bolts, which will be replaced by upsized silicon bronze. We have yet to cut stopwaters for these joints, and will do so using softwood dowels.

